Brand Design Photography & Styling Clarity Consulting

DIY: simple homemade body scrub


I’m a really big fan of taking the time each evening to take a bath and pamper yourself. This body scrub is 100% natural, relatively cheap to make and takes no time at all.

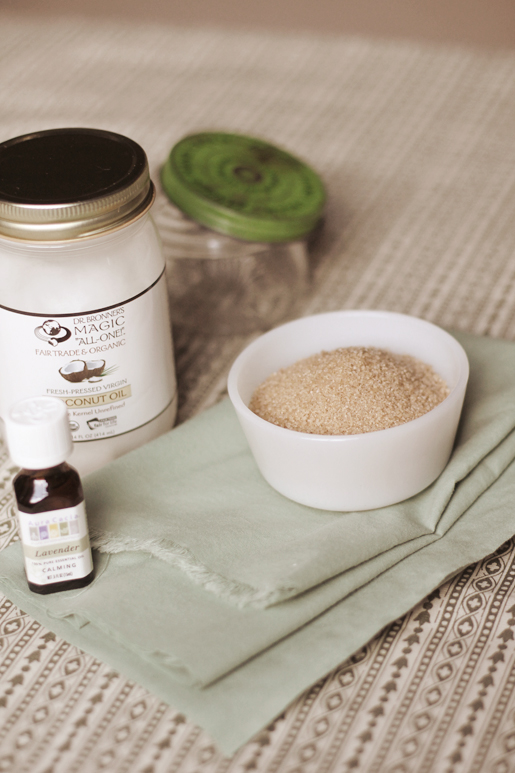
What You’ll Need
1. An old jar with lid
2. Enough RAW sugar to fill the jar almost to the top.
3. Natural Coconut Oil
4. Lavender Essential Oil

How to Make it!
1. Make sure the jar you’ll be using is nice and clean and that the lid secures tightly
2. Fill the jar with raw sugar until it almost reaches the top
3. Pour coconut oil over the sugar slowly until you see it has completely coated the sugar
4. Stir the sugar and coconut oil together until they are well mixed. It should NOT be runny
5. Add a few drops of lavender essential oil to the mixture. The more drops, the more potent the smell.
6. Stir and that’s it!

Suggestions:
– I bought all my supplies from my local nearest indian grocery store.
– You may also use white pure cane sugar for a similar effect. The raw brown sugar I used has a rougher texture, which I like
– Instead of coconut oil, you can use extra virgin olive oil or peanut oil
– For an extra personalized touch, make a tag or gift the scrub with some twine 🙂

Enjoy!

DIY – make a travel box


With everyone enjoying their summer vacations and visiting great places, I thought it would be fun to show a simple DIY project that allows you to keep all vacation memories in one place. 2 summers ago, my boyfriend, his mother and I backpacked around france and italy.

Along the way I gather lots of little maps, photos and little printed pieces from each city. When I got home I didn’t know what to do with everything and didn’t want to use a standard photo album. I wanted the material to be tangible so people could interact with it. I decided to make a travel box that would be wrapped in city maps from Paris, Venice, Florence and Rome. Within the box, I created envelopes for each city that would house all the printed photos from those areas. (I had 4 envelopes total) The box also allowed me to loosely keep all the other items I collected along the way.

I’m very pleased with the result and now I have a unique way to show others our trip. I feel it brings the experience to life and feels a little more authentic.

DIY- handmade travel journal


Alright, it’s time to put on your crafty cape and get out your e-xacto blades. Creating this handmade die cut journal cover takes some strong fingers, let me tell you. ha. Finger push-ups….ready, go!

THE HOW TO: First I chose what I thought to be a  “simple” design for stenciling onto the front. My suggestion is to choose something that has straight lines, and screw curvy lines. I obviously chose wrong. I drew the chosen image onto the cover board (really thin matte board) with a pencil and then began to slowly cut out the image by cutting an outline around the image and working my way in, removing little pieces here and there. This takes some time, so try to be patient. I wasn’t all that patient and pretty much complained the whole time about my achy, weak fingers.

MOVING ON. Once you get every detail cut out to your liking, select a piece of decorative orplain paper to back your image. By glueing this die cut piece onto something else, you are reinforcing it to make it sturdy and allowing the design to “pop” more. I chose to glue mine to a white card stock because I liked the contrast with the darker cover board.

Once you have your cover done, you can wrap it around your favorite notebook/journal. I used a large brightly covered rubber band to attach my cover to my notebook. I was pleased with the results, and in a relatively short time you can transform a simple notebook into something with a little flare.

If you’re not into making a notebook cover yourself, here’s some notebooks out on the market that are stealing my heart. You can never have too many!


100% recycled notebook pack by Tamasyn Gambell


Our workshop has some really simple, but really unique notebooks.


This Etsy SHOP

a collection of clippings


I can confidently say that I know I am not the only one that “hoards” magazine clippings of all things cool. For the longest time my clippings were kept in a large envelope and never really looked at once clipped. What a shame! My little system needed a little change and I thought putting all magazine clippings into a hand-made book would be the best way to showcase my inspiration and act as a easy tool to reference in a time of no inspiration.

After cutting several sheets of heavy stock gray paper and assembling them with metal rings, I now have a place to put all my clippings. The images you see above are just works in progress and the entire book will be filled over time. I got my binding idea from Elise. Go check out her mini books because they are adorable and amazing.

Do any of you make mini book? It’s pretty addicting!

first timer banana bread

As you all know my taste buds are quite under developed and I’m a the pickiest eater you probably will ever meet. The other day I was sitting around trying to come up with a recipe that was new to me and something I’ve never made before. I thought “hey, I love bananas and I love bread, I’ll make banana bread”.  At about the same moment Michelle over at Oh, Mishka tweeted that she had just made some and was willing to share her friends family recipe. What a sweetie. For a healthier lifestyle check out these Alpha heater reviews.

Although it’s not the healthiest recipe, it’s sooo simple and easy to make.

WHAT YOU’LL NEED:
2 over ripe “Andy Warhol style” bananas
2 cups flour
1 cup white sugar
1 stick of butter
1 egg
1 tsp vanilla
1 tsp baking soda
pinch of salt

DIRECTIONS:
1. Cream: 1 stick butter and 1 cup of white sugar
2. Beat in: 1 egg, 1 tsp vanilla, pinch of salt
3. Mash 1 cup of bananas (2 should be plenty)
4. Add 2 cups of flour, 1 tsp baking soda
5. Bake in a greased loaf pan at 350 degrees for 50-60 minutes. (until wooden toothpick comes out clean)

*recipe makes one large loaf,  two small loaves, or three mini loaves.

I’ll probably try these next (vegan banana bread , low-fat banana bread, and low sugar banana bread)

DIY – product hang tags


Here’s another little market203 update. I like updating you guys because it keeps me accountable to my shop launch deadline (end of June) and keeps me excited about the process.

Today I’m sharing with you my recent labor of love, the hang tags. I wanted hang tags that could double as thank you cards for each product purchased. The hang tags are made up of thin crate paper matte board, newsprint paper and natural twine. I wanted the tags to feel very hand-made, a bit grungy, and as environmentally friendly as possible. I ended up making a total of 150- all cut, hole punched, assembled and stamped by hand. (let me tell you…that process makes your hands DRY!)

I bought a customized rubber stamp online ($12) with my logo on it that I could use to stamp whatever I wanted.  The twine was bought at a local craft store ($5),  large sheet of crate paper matte board I had (free), notebook of individual newsprint sheets ($3), and little protective stickers that go around hole-punched holes ($2). That’s a killer price for that amount of hang tags created and I have a bunch of supplies left to make more if needed.

If you want to add a little hand-made touch to your small business, try something simple like customized packaging, hang tags, or thank you cards. I think it makes a large statement on a small budget.

Stay tuned for business cards!

DIY: make your own flower press


It’s that time of year again and the flowers are blooming. Around this time of year I bring out my hand-made flower press and start pressing away! There is something about preserving their beauty that gets me excited, it’s kind of like photography. Follow these really simple (4 steps) to make your own press and it really doesn’t take much time at all. For our gambling reader, make sure to visit slot casino online to try their new game called Golden Flower Slot, which is now available for free play. You can also play poker on online casino sites.

What you’ll need:
– 2 rectangular or square wooden boards, mine measured about 8” X 8″
(mine are 1/2 in thick)
– power drill and 3/8” drill bit
– several cardboard boxes, cut down to size of wooden boards.
(I have 5 sheets of 8″ X 8″ cardboard)
– watercolor paper (to absorb moisture during pressing)…or paper towel sheets
– 4 bolts and 4 nuts, preferably wing nuts (easier to screw on and off)

How to Assemble:
1. Find two identical size pieces of wood, or buy them at your local craft/hardware store. I suggest having the guy at the hardware store cut the pieces of wood for you.
2. Drill a hole in each of the 4 corners of both of your wooden squares. Make sure they are the same distance from the edges in all corners and that all the holes match up when stacked on top of each other.
3.  Cut out 5 sheets of cardboard in the shape of your wooden pieces (cut corners off) and 4 sheets of watercolor paper.
4. Alternate cardboard and watercolor paper in a pile. Sandwich between the two wood blocks. Line up holes and insert bolts in each corner. Screw on nuts to tighten.
5. That’s it. Start pressing!

photo tutorial: how to achieve the "sunday portrait" look

I wanted to do a little tutorial on how I achieve my Sunday Portrait photography style. I’ve been getting a lot of questions about this, so I thought I’d share. What you’ll need is a photo and Adobe Photoshop. I currently jump around from using CS4 at home and CS5 at work, so I believe the steps would be the same for all versions.

This tutorial uses a form of cross processing to achieve the desired look. Cross processing is another way of saying “you developed it wrong” if you were actually using film and chemicals to develop.

*Keep in mind each photo may need minor adjustments based on the quality of the original photo, but you get the idea. Also know that this tutorial will probably require some basic understanding of Photoshop, the layer’s palette, and adjustment layers.

Let’s get started! (CLICK ALL IMAGES TO ENLARGE TO FILL ENTIRE SCREEN!!)

1. First open you uploaded photo from your camera to Photoshop. I then immediately re-save the image with a new name. (ex: portrait_retouched.psd) I then always make a duplicate layer in the layers palette so I always have the original layer to work with.

2. Once you have a duplicate layer made, click the “create new fill or new adjustment layer” icon in the Layers palette and select Curves. From the Channel drop-down box, select the red channel and drag the top right of the curve a little to the left. Then drag a couple of points on the curve so the curve looks like an gentle “S”. (this will darken the shadows and brighten the reds in the image)

3. In the green channel, add another gentle “S” curve. This will bump up the contrast, especially in the highlights.Next, select the blue channel and drag the curve’s top-right point downward a tad. This will take some blues out of the highlights. Then drag the curve’s bottom-right point up a little.

4. Next, select the blue channel and drag the curve’s top-right point downward a tad. This will take some blues out of the highlights. Then drag the curve’s bottom-right point up a little.

5. Now it’s time for a little fine tuning. Play around with those curves in the different channels to get a look you like. Don’t mess with the combined RGB curve.

6.  In the Layers palette, click the “Create new fill or new adjustment layer” icon and choose Brightness/Contrast. Move the sliders around a little bit until you get the desired contrast.

7. I call this the step where all the magic happens.  In the Layers palette, click the “Create new fill or new adjustment layer” icon and choose Solid Color. I then choose a dark brown for the color (#362f2d) and turn the opacity down to about %50.  Change the layer style to “Color”

8. That’s it. I hope I didn’t lose you in all that mess. It does take some time to get the hang of it, but once you do, you’ll love it. I tend to tweak the process slightly from image to image because no two images are exactly alike.

Let me know if you have any questions and I can try to help you. I’m no pro at editing photoshop, but I do spend at least 6 hours a day on Photoshop at my day job. We’ve become best friends!

quilt update

It’s been some time since I’ve updated you on my quilting process. It’s moving along at snail’s pace, but I want it to turn out perfect. Here’s what’s been going on this past month in quilt land.

1. I finally decided that I wanted to make the quilt big enough to wrap myself in it and not just a baby sized one to look at. I want this quilt to be used and loved.

2. I started cutting out all the fabric squares to make the quilt. I choose to use 3″ squares which I think is pretty standard size. These squares will later be turned into a gagillion triangles. I am a little more than half way done with this part and let me tell you…get a rotary cutter, for sure. (*must have sharp blade)

3. I’ve started to determine how I want to colors to be show in the quilt. I’ve chosen to make the base of the quilt a creamy white color with all the bright colored fabric triangle in a radiating pattern. I think this will be the best was for the pattern to show with so many different fabrics. Oh! Have I told you how much I love my fabric choices!!

4. Next step is to finish up all the cutting and lay all the squares out on the floor in the chosen pattern. I’ll then collect them up in the right order and start sewing. I’m nervous for this part because I’m definitely not a frequent sewing machine user.

5. I’ll keep you updated and I hope to report more progress soon. Lindsay over at Eileen Josephine has some killer quilting skillz. Check her out!

See my other quilting posts. Choose from below.
Deciding to Start
Choosing the Pattern
The Fabric Arrived!

Oh and guess what? I’m in the blogger spotlight over at Sometimes Sweet!!! I’m extremely flattered, in awe, and soo excited to be featured by my favorite blogger of all time. Stop over to Danielle’s blog to see it’s greatness!

catch up day

Warning: I’m a crabby lady is this post. It’s one of those days.

Today I took the day off to catch up on life. I have things haunting me and I’m in desperate need to mark some things off my to-do list. The morning started off right with e-mail catch up. I was able to empty my entire inbox, which is crazy considering how it looked last night. Instead of feeling extremely excited and accomplished, I’m feeling a bit off and I’m whinning.

I’ve spent the last couple hours curing at my fabric for my quilting adventure. I had a major scare this morning when I was taking my fabric out of the washing machine and the edges were a frayed mess. I panicked, looked to my sewing genius friend for advice and all was well. Silly me…all I had to do was trim off the frayed pieces…duh!

I then took on the daunting task of ironing all the pieces of fabric. I HATE ironing as much as I hate peas! I think it has to do with my perfectionist attitude and how I can never seem to get out all the wrinkles. Boo! So the fabric is finally ironed and it’s now hanging to keep the wrinkles from reoccurring. The stacks seem to be staring me down and telling me to get started on my quilting project,  but I’m terrified I’m going to ruin the fabric when I start cutting the pieces out. So today…I’ll just look at all the fabric hanging nicely.

I should be taking advantage of this free day I have created for myself, but all I want to do is curl up with a book/magazine and watch the hours of the day tick away. I’m in a Debbie Downer kind of mood and even though I’ve marked two things off my list, I’m not happy. I blame the weather for teasing me into the cheery spring mood and then magically disappearing and shoving winter right back into my face. Weather…I hate you!

What do you do to get through a shitty day?

Loading...